Testing SCD41, BME280, BME680, DS18B20, PT100 and SNZB-02P temperature sensors for DIY thermostat

A crucial step towards my goal of individual room temperature control is to be able to measure current room temperature with precision and minimum amount of lag. Unfortunately, off-the-shelf battery-powered devices like Sonoff SNZB-02P are not really suitable for such a task. They are quite good at measuring temperature and humidity, but their out-of-the-box reaction time is slow due to the need to conserve battery (more on changing update frequency below). For example, SNZB-02P reports temperature only once per hour, given there are no rapid temperature changes like an open window in the winter. Such update frequency will lead to a dramatic overshoot in room temperature, so I decided to make my own ambient temperature sensor. It will also be a mains-powered device because I want to minimize the amount of battery hassle in my smart home. I decided to test several sensors and choose one that is most suitable for this task.
Reference sensor (PT100)
I made several attempts at testing these sensors, but earlier iterations had one flaw: I didn't have a ground truth sensor, so I had no way of telling which sensor showed correct values. At some point I decided to stop goofing around and find a way to make precise measurements to compare all the other sensors to. Turns out, you don't need a laboratory-grade device for that: PT100 RTDs are relatively cheap and very precise. I got a 3-wire version from a local electronics supplier, along with a MAX31865 board, which removes all the hassle of interpreting resistance values and just gives the final measurement over SPI. Be sure to read the original Adafruit tutorial, because the board needs some tuning depending on what type of RTD you have. My board was definitely not the original Adafruit version (rather a Chinese knock-off really), but it still works nicely. I also removed screw terminals and sensor connectors, and soldered the wires directly to the board in order to minimize parasitic resistance from an accidental poor connection.
I then soldered a basic test board with a MH-ET LIVE MiniKit and the following ESPHome configuration:
esphome:
  name: sensor-tester
  friendly_name: Sensor Tester

esp32:
  board: mhetesp32minikit
  framework:
    type: esp-idf
    version: recommended

wifi:
  ssid: !secret wifi_ssid
  password: !secret wifi_password

# Enable Home Assistant API
api:
  encryption:
    key: !secret api_key

ota:
  - platform: esphome
    password: !secret ota_password

logger:
  level: INFO

# RTD Configuration
spi:
  clk_pin: GPIO18
  miso_pin: GPIO19
  mosi_pin: GPIO23

sensor:
  - platform: max31865
    name: "RTD Temperature"
    cs_pin: GPIO5
    update_interval: 10s
    reference_resistance: 430 Ω
    rtd_nominal_resistance: 100 Ω
    mains_filter: 50 Hz
    rtd_wires: 3
    filters:
      - offset: 3.10 # Calibrated by ice water test :)
Calibrating the sensor
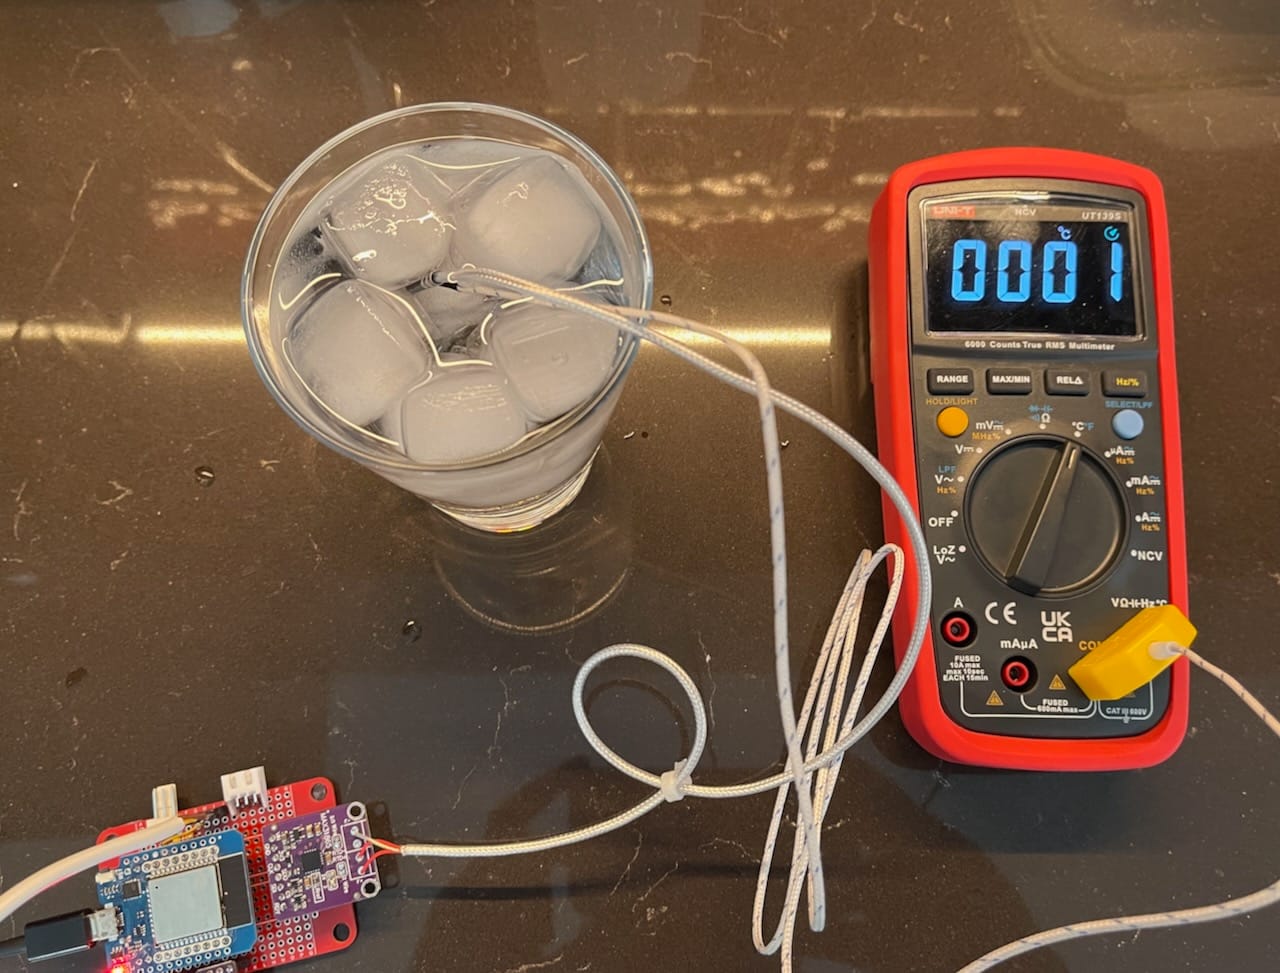
PT100 is a precise sensor, but I soon found that it steel needed calibrating. The easiest method I could find to calibrate at home was to submerge the sensor into ice water. The idea is that in order to calibrate a sensor, you need a known reference point, and it's known that water turns to ice at 0° C. So we can assume that ice water is close to 0°C and calibrate the sensor accordingly. It's not a precise method, but we are not running a lab here, and such precision will be more than enough for room temperature control. So here is the calibration process where I submerge the RTD into ice water along with a temperature probe from a multimeter to verify we are indeed in the vicinity of 0°C.
Test setup
Here is a photo of my testing rig with all the sensors.
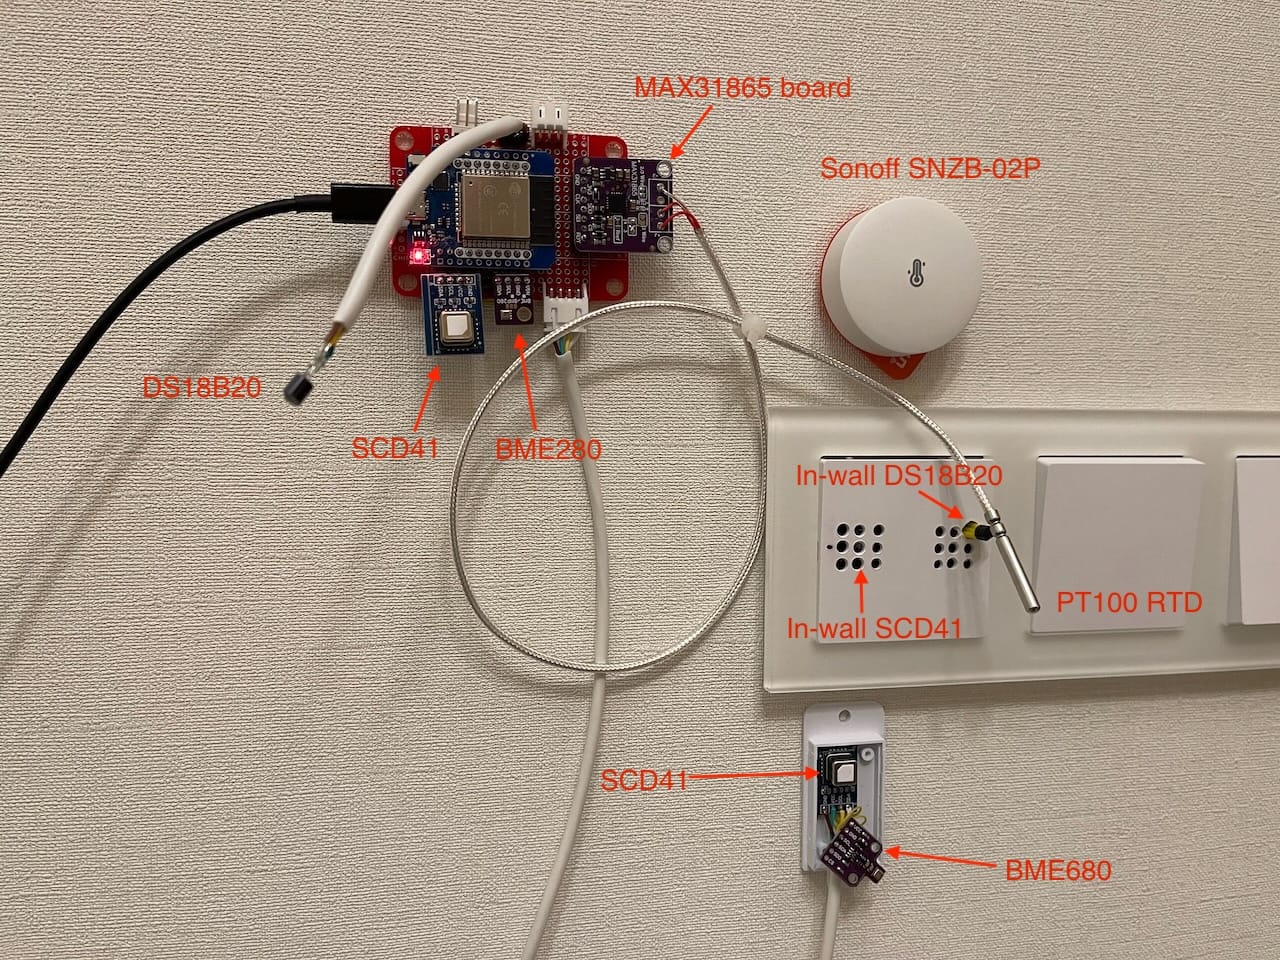
Now, that's A LOT of sensors 😄 Here is what's going on:
- I've got a separate in-wall ESPHome device with SCD41 sensor in its own enclosure and a DS18B20 sensor that just barely shows itself. The original idea was to have a single in-wall device that measures heated floor temperature with a separate DS18B20 probe, and also measures room temperature (and hopefully humidity and CO2) through small cutouts in the decorative wall panel (test holes are not pretty; I was going to ultimately use laser engraving).
- There is a PT100 reference sensor.
- Test board has SCD41 and BME280 sensor which are not enclosed.
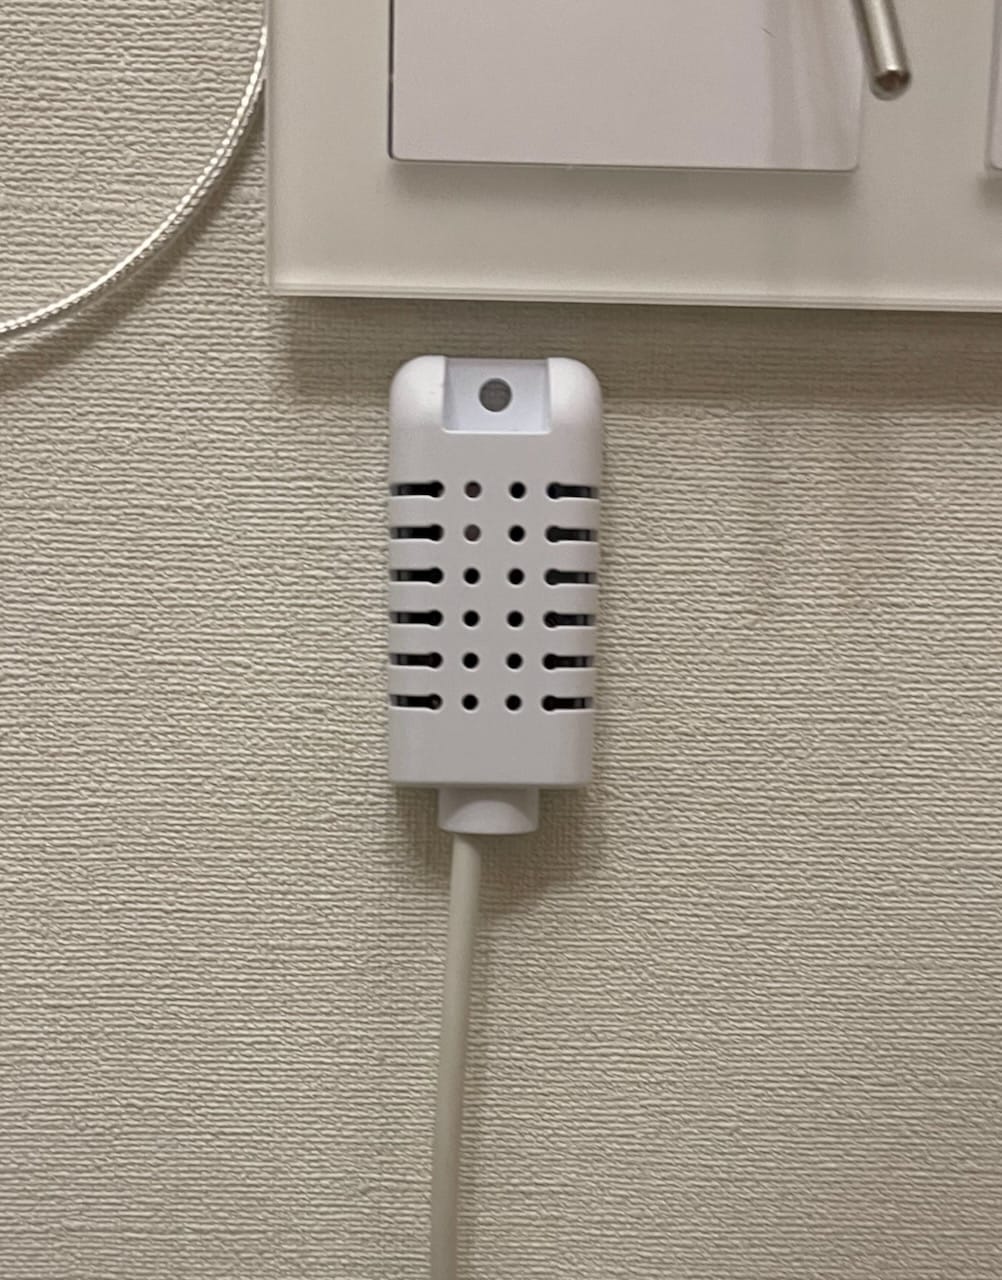
- The lower enclosure contains another SCD41 and BME680 sensors. The idea is to see whether adding an enclosure to the sensor hurts its performance. I also tested a configuration where BME680 was replaced with a second BME280, so that enclosed version could be compared with the dangling one. The enclosed variant looks like this:
I also made a dashboard in Home Assistant using awesome lovelace-plotly-graph-card integration.
DS18B20: the simplest and most responsive, but not when inside the wall
It turns out that a good old DS18B20 sensor follows my reference RTD with the most precision and responsiveness. But there is a caveat: it shouldn't be placed very close to a wall, and not inside the wall socket like I originally wanted.
In-wall sensor
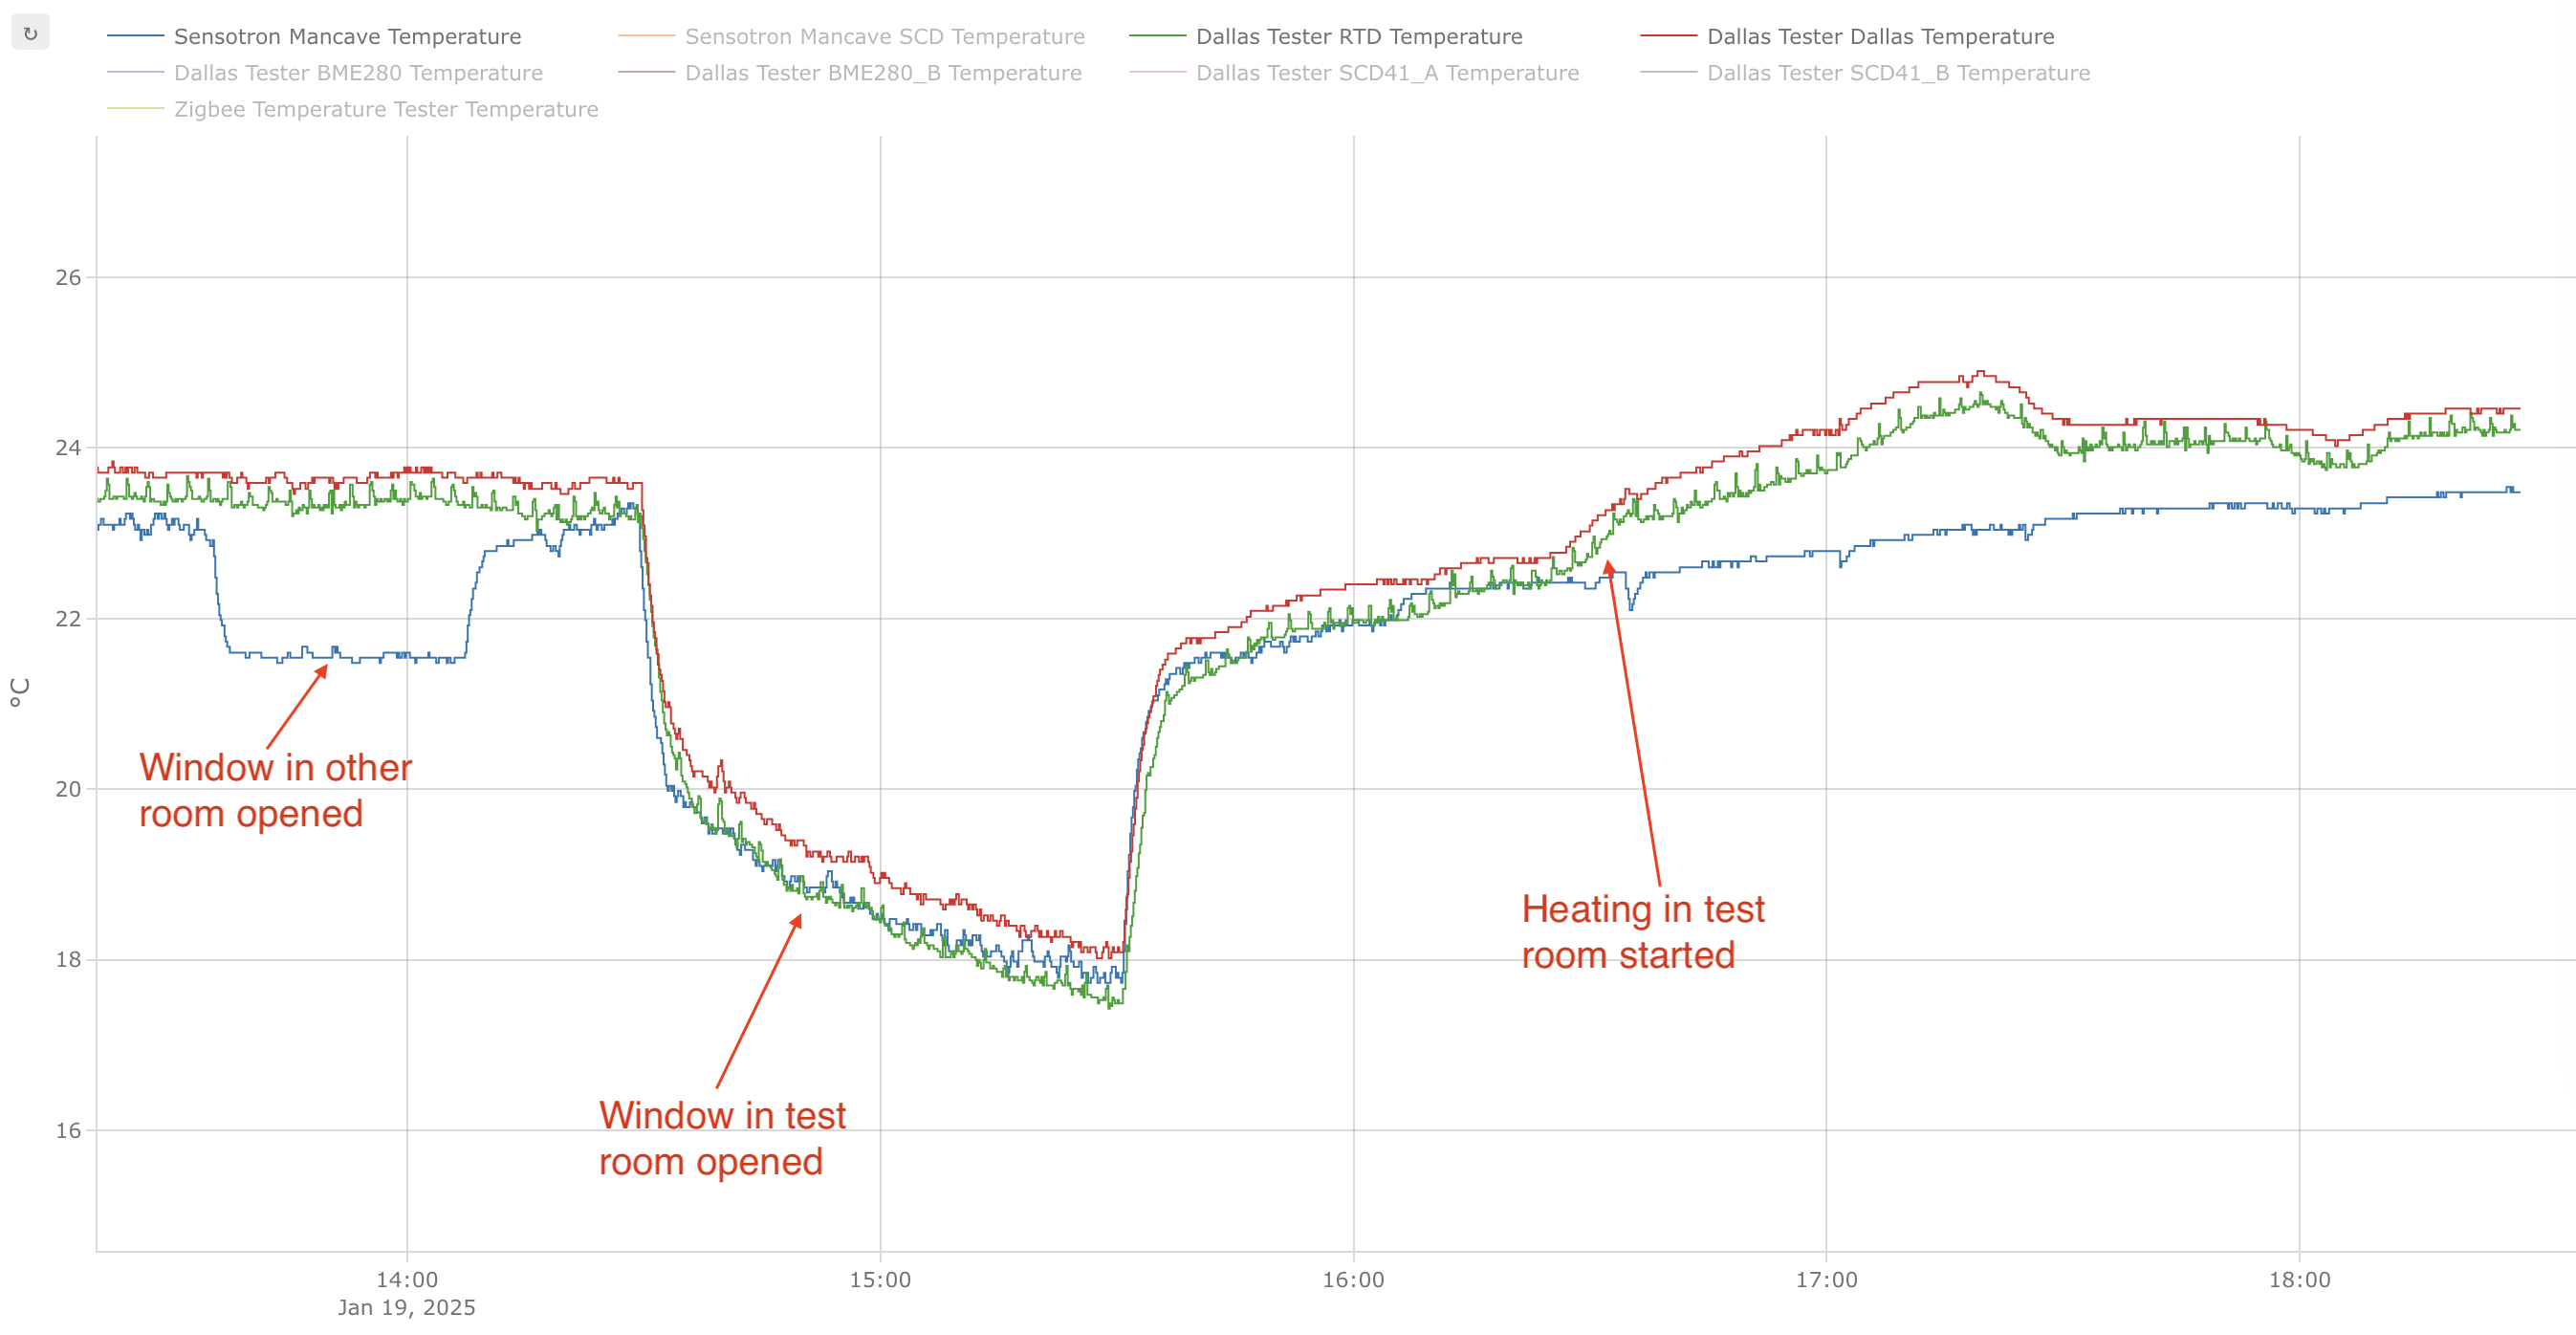
My in-wall DS18B20 isn't even really inside the wall, but still it doesn't respond well to increases in temperature when radiators start heating the room. It follows RTD quite closely when there is no heating and room temperature is more or less the same, and it even detects when I open the window in the adjacent room, while no other sensors detect that (it's 10-20 cm closer to the door, and that's enough to catch a draft). But when radiators are turned on, this sensor doesn't detect rising heat as rapidly as the dangling sensor. Unfortunately, such behavior will result in heavy overshoot and in-wall variant can't be used for reliable temperature control.
Dangling sensor
The dangling DS18B20 on the other hand followed the reference sensor precisely and with no lag. So if it's acceptable to just leave an unenclosed DS18B20 in your setup, this is the cheapest and most hassle-free option to measure room temperature.
Here is a graph showing reference RTD in green, dangling DS18B20 in red (needs to be offset just a little) and in-wall DS18B20 in blue:
BME280: unreliable temperature and humidity.
First of all, it should be noted that BME280 is a humidity and pressure sensor. The datasheet clearly states that temperature sensor is primarily used to compensate readings for pressure and humidity, and ambient temperature can be at best estimated. In my initial experiments, temperature readings proved to be quite good in both sensors I tested, while humidity readings were off by whopping 15 points comparing to all other sensors. I don't have a reference humidity sensor, but given that literally all other sensors showed humidity around 40%, both BME280 sensors were showing around 25-27%. The problem with temperature reading became apparent after I tried using this sensor for a couple of days. Unfortunately, my BME280 sensors turned out to be susceptible to huge temperature drifts at the scale of 1-2° which renders them completely useless for fine-grained room temperature control. I am removing a remaining part of this post concerning the BME280 sensor since it proved to be mostly inaccurate.
BME680: great when not enclosed, decent when enclosed. Unreliable CO2 readings.
BME680 is a gas sensor, which can also measure temperature and humidity. I was hoping that this sensor will allow me to monitor not only temperature, but also air quality in the room, so that alarm could be raised when CO2 climbs to dangerous levels. There is also a BSEC2 library from Bosch that allows to estimate a ton of different gas-related readings, as opposed to the simple mode when only temperature, pressure, humidity and gas resistance is supported. As was hoping to estimate CO2 levels, I opted for BSEC2 version in my tests.
Unfortunately, CO2 reading turned out to be completely unreliable for me. BME680 has an elaborate self-calibrating procedure, which takes into account historical data from the environment the sensor is exposed to. In my earlier experiments this sensor showed some adequate CO2 readings after 1.5-2 days of continuous operation with windows being opened periodically and people present in the house. But then we left for a week, the sensor became uncalibrated, showing super high value when we came back. There is no way to alter this calibration procedure (you can only set the number of days that are taken into account), and self-reported calibration status from the sensor ("calibrating", "uncertain", "calibrated") in practice doesn't reflect the reliability of CO2 reading.
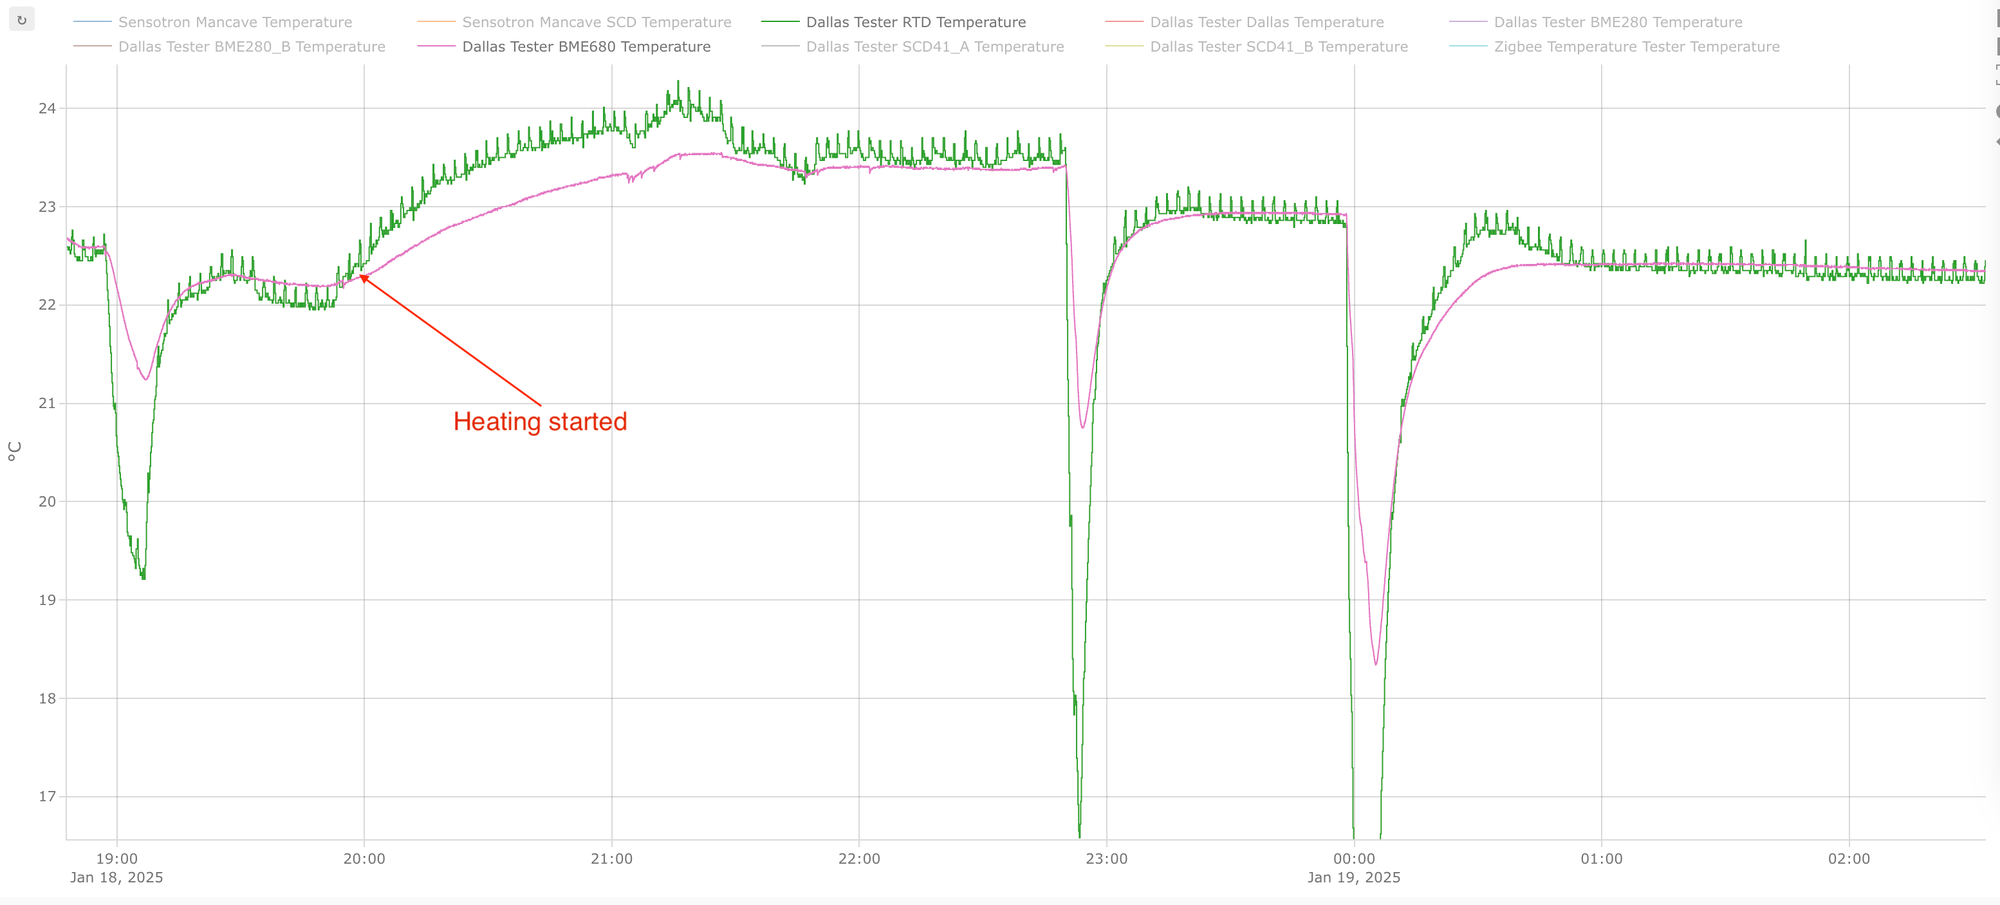
I had no means of checking all the other gas-related readings from this sensor, but pressure, temperature and humidity readings were great and dynamics was similar to BME280 in both enclosed and unenclosed variants (additionally, humidity reading was correct unlike BME280). Enclosed version of BME680 also didn't show a drift when temperature dropped to 22 °C at night, and it followed reference RTD rather nicely. But then again, BME680 is much more expensive than BME280, so I see no reason to use it in a simple home automation setting given the unreliable CO2 readings. Don't get me wrong: BME680 might be a great sensor in some industrial applications, but for me it's definitely an overkill. Also, if you are living in your house continuously and open the windows from time to time, CO2 readings from this sensor might work great for you. There is also a chance that I got some sketchy knock-off sensor, since almost all my sensors were sourced from AliExpress (see the note above).
Here is a graph showing reference RTD in green, and enclosed version of BME680 in purple:
SCD41: good when not enclosed, decent when enclosed. Great CO2 readings.
SCD41 was the original sensor that I considered using for my project. It is a CO2 sensor (notice how most of the fancy sensors make a point of not calling themselves temperature sensors) and it also has consistent humidity readings. One drawback that I noticed is inconsistency in temperature sensing response between two sensors working in the same conditions (both without enclosure). In the graph below you can see these sensors in purple and gray. One sensor follows reference RTD (in green) quite closely, while the other clearly lags behind:
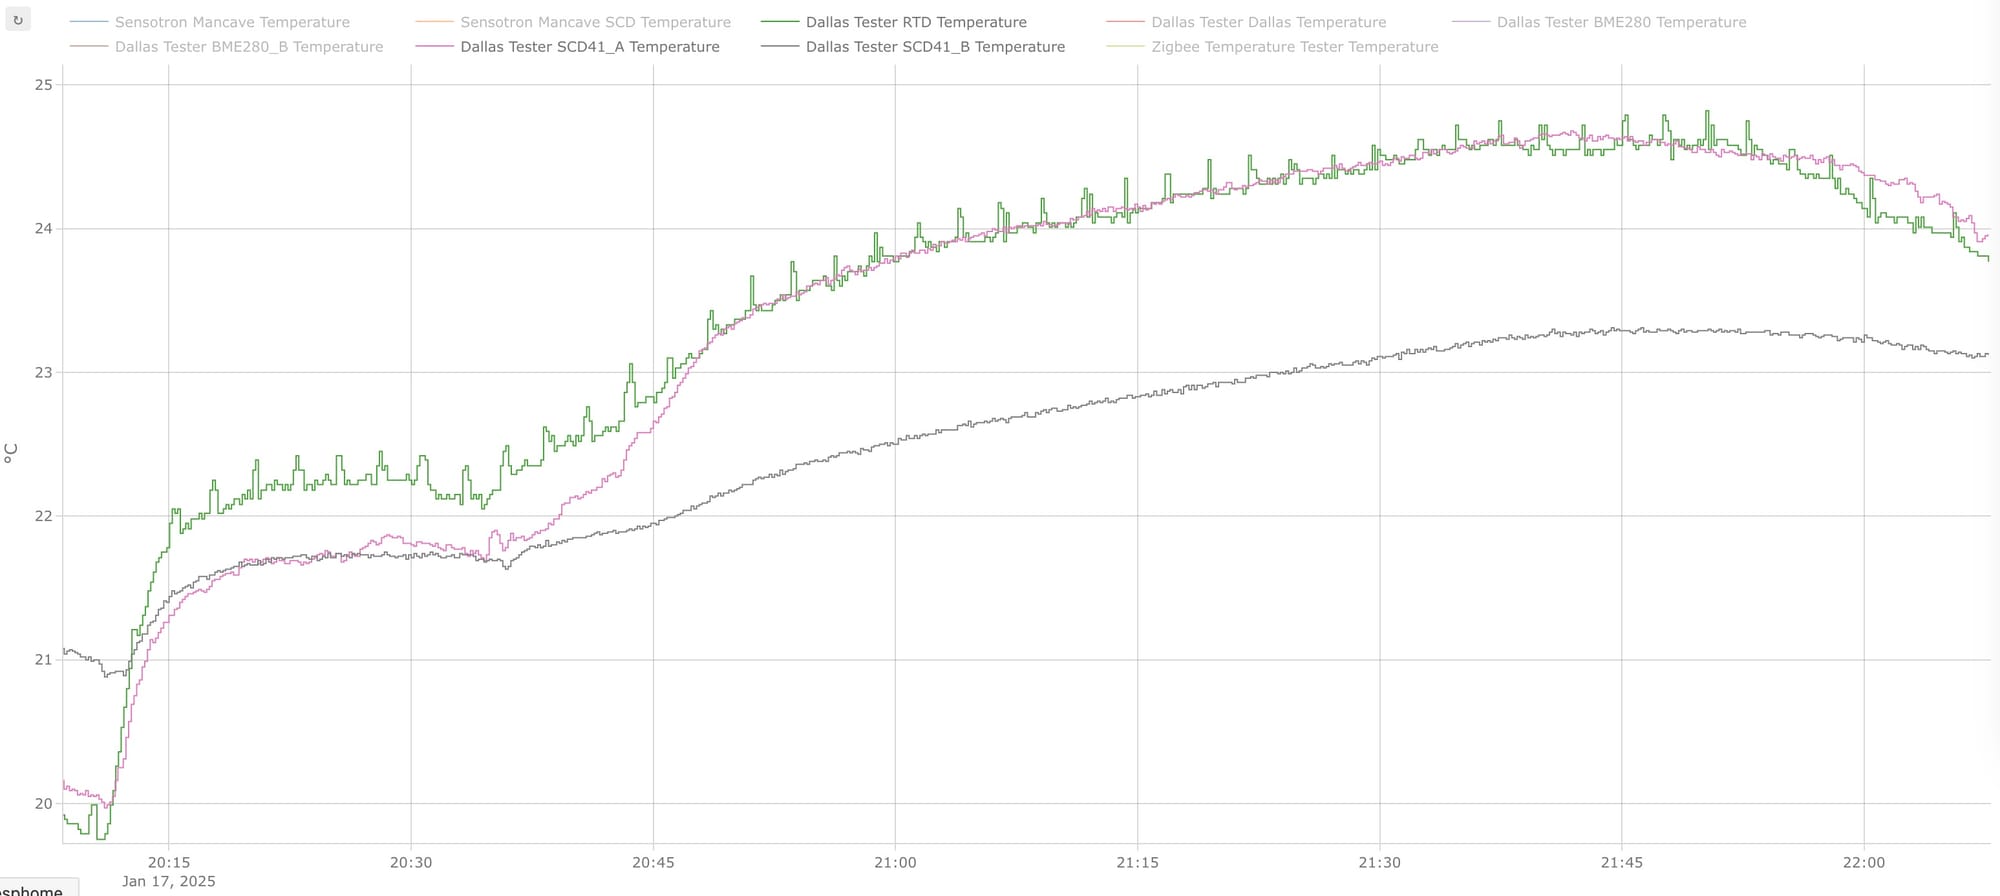
Humidity and CO2 readings from these sensors follow each other very closely, so I have no explanation for such a difference in temperature sensing behavior. CO2 readings are very consistent, but unfortunately I don't have a reference sensor to estimate their correctness.
In-wall sensor
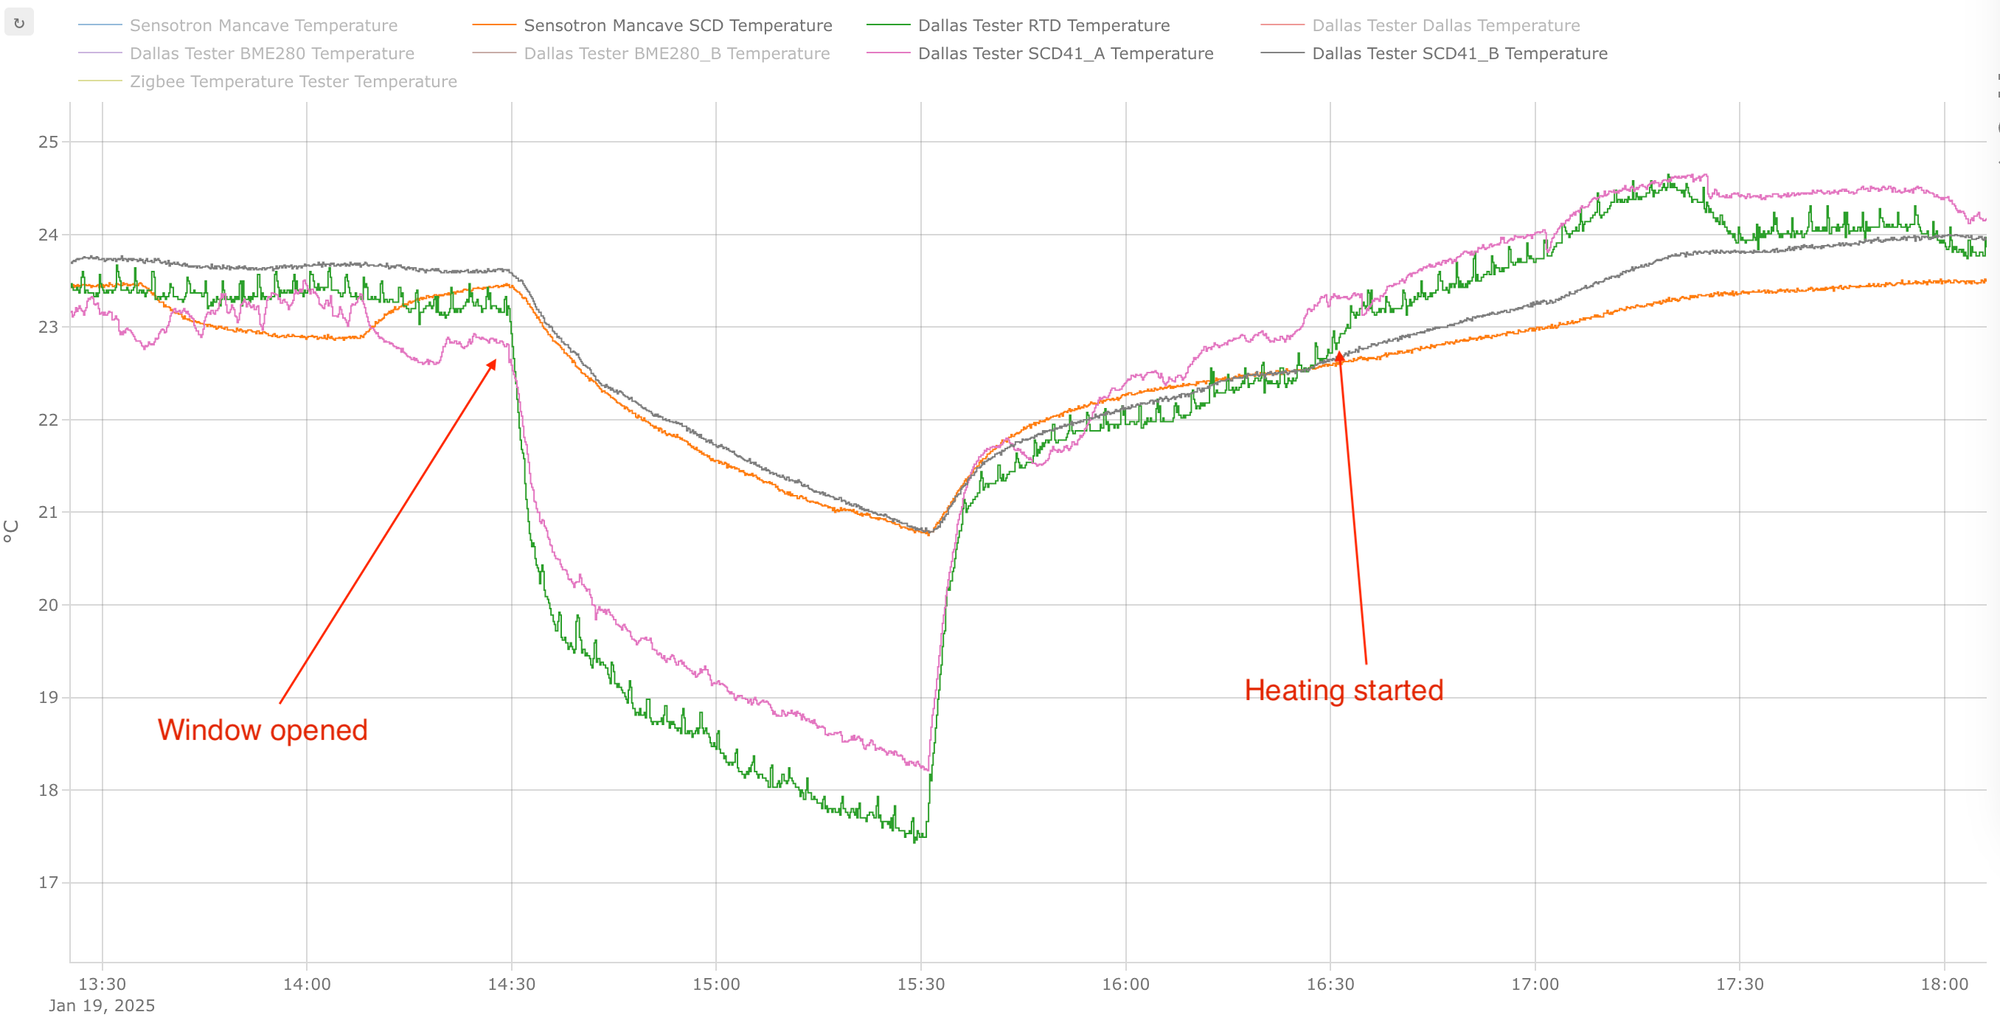
As you might remember from the beginning of the post, my original idea was to hide the sensor in the wall socket behind a decorative panel with laser-engraved cutouts. I also made a separate isolated enclosure for the sensor inside the wall socket so that heat from the main device wouldn't interfere with the readings. Sensirion has an excellent design-in guide at their website, which I tried to follow as close as possible. Unfortunately, this idea didn't pan out. My tests show that temperature sensing response from in-wall SCD41 is abysmal, with sensor reacting very poorly to changes in room temperature. Humidity readings were also consistently higher than those from other sensors. The only reading that was not at all affected was CO2 level. It seems that these sensors are really good at measuring CO2 (which is their actual purpose), no matter what enclosure you place them in.
Enclosed sensor
Enclosed version of SCD41 performed very closely to BME680 in its temperature measurements. I need to point out that I put a more laggy SCD41 into the enclosure, and while unenclosed BME680 followed reference RTD very closely, when both laggy SCD41 and BME680 were placed inside the enclosure, their performance became almost the same. Temperature response from SCD41 was not awesome when the heating was turned on, but it's comparable with BME280. I also noticed a more prominent deviation from reference RTD during the night when temperature dropped to 22 °C, just as with BME280.
Humidity and CO2 readings were great, and seemed not to be affected by adding an enclosure at all.
Dangling sensor
Unenclosed version of SCD41 did a very good job at following reference RTD. But then again, as I mentioned earlier, the identical unenclosed SCD41 showed much poorer temperature response at the same time.
The following graph is a bit overcrowded showing reference RTD in green, in-wall SCD41 in orange, enclosed SCD41 in gray and dangling SCD41 in purple:
Sensor calibration
SCD41 can also be calibrated: either automatically or manually. The best option is to leave automatic calibration on (set automatic_self_calibration in ESPHome config to true), but that requires that you expose the sensor to outdoors level of CO2 from time to time (basically open a window really wide for a couple of minutes 😄 ).
You can also set automatic_self_calibration to false, but you should calibrate your sensor once:
- Add an action that calls calibration function as described in ESPHome docs. I usually create a template button and press it from Home Assistant:
button:
  - platform: template
    entity_category: config
    name: "Calibrate SCD"
    on_press:
      then:
        - scd4x.perform_forced_calibration:
            value: 425
id: scd_sensor # sensor id- You can estimate current outdoors CO2 levels at https://www.co2.earth/daily-co2 and replace the value
419from the example (yes, global CO2 levels are not419 ppmanymore 😦 ). - Run your sensor for more than 5 minutes outdoors and activate the calibration action.
Beware that CO2 readings will drift with time, so you will need to either perform another manual calibration or enable automatic_self_calibration.
Pressure compensation
I tested SCD41 with ambient_pressure_compensation_source enabled (from a BME280 sensor), but it didn't seem to make a difference in my environment.
Sensor-to-sensor variability
I had several SCD41 sensors on hand, and discovered that temperature and humidity sensing capability was not uniform across all sensors. Some units tracked temperature quite nicely, but others clearly had lower sensitivity to changes in temperature. Also, some sensors consistently report humidity values that are quite off from the rest of the bunch. CO2 readings, on the other hand, were good and consistent across all sensors.
SHT40: the best option for temperature and humidity
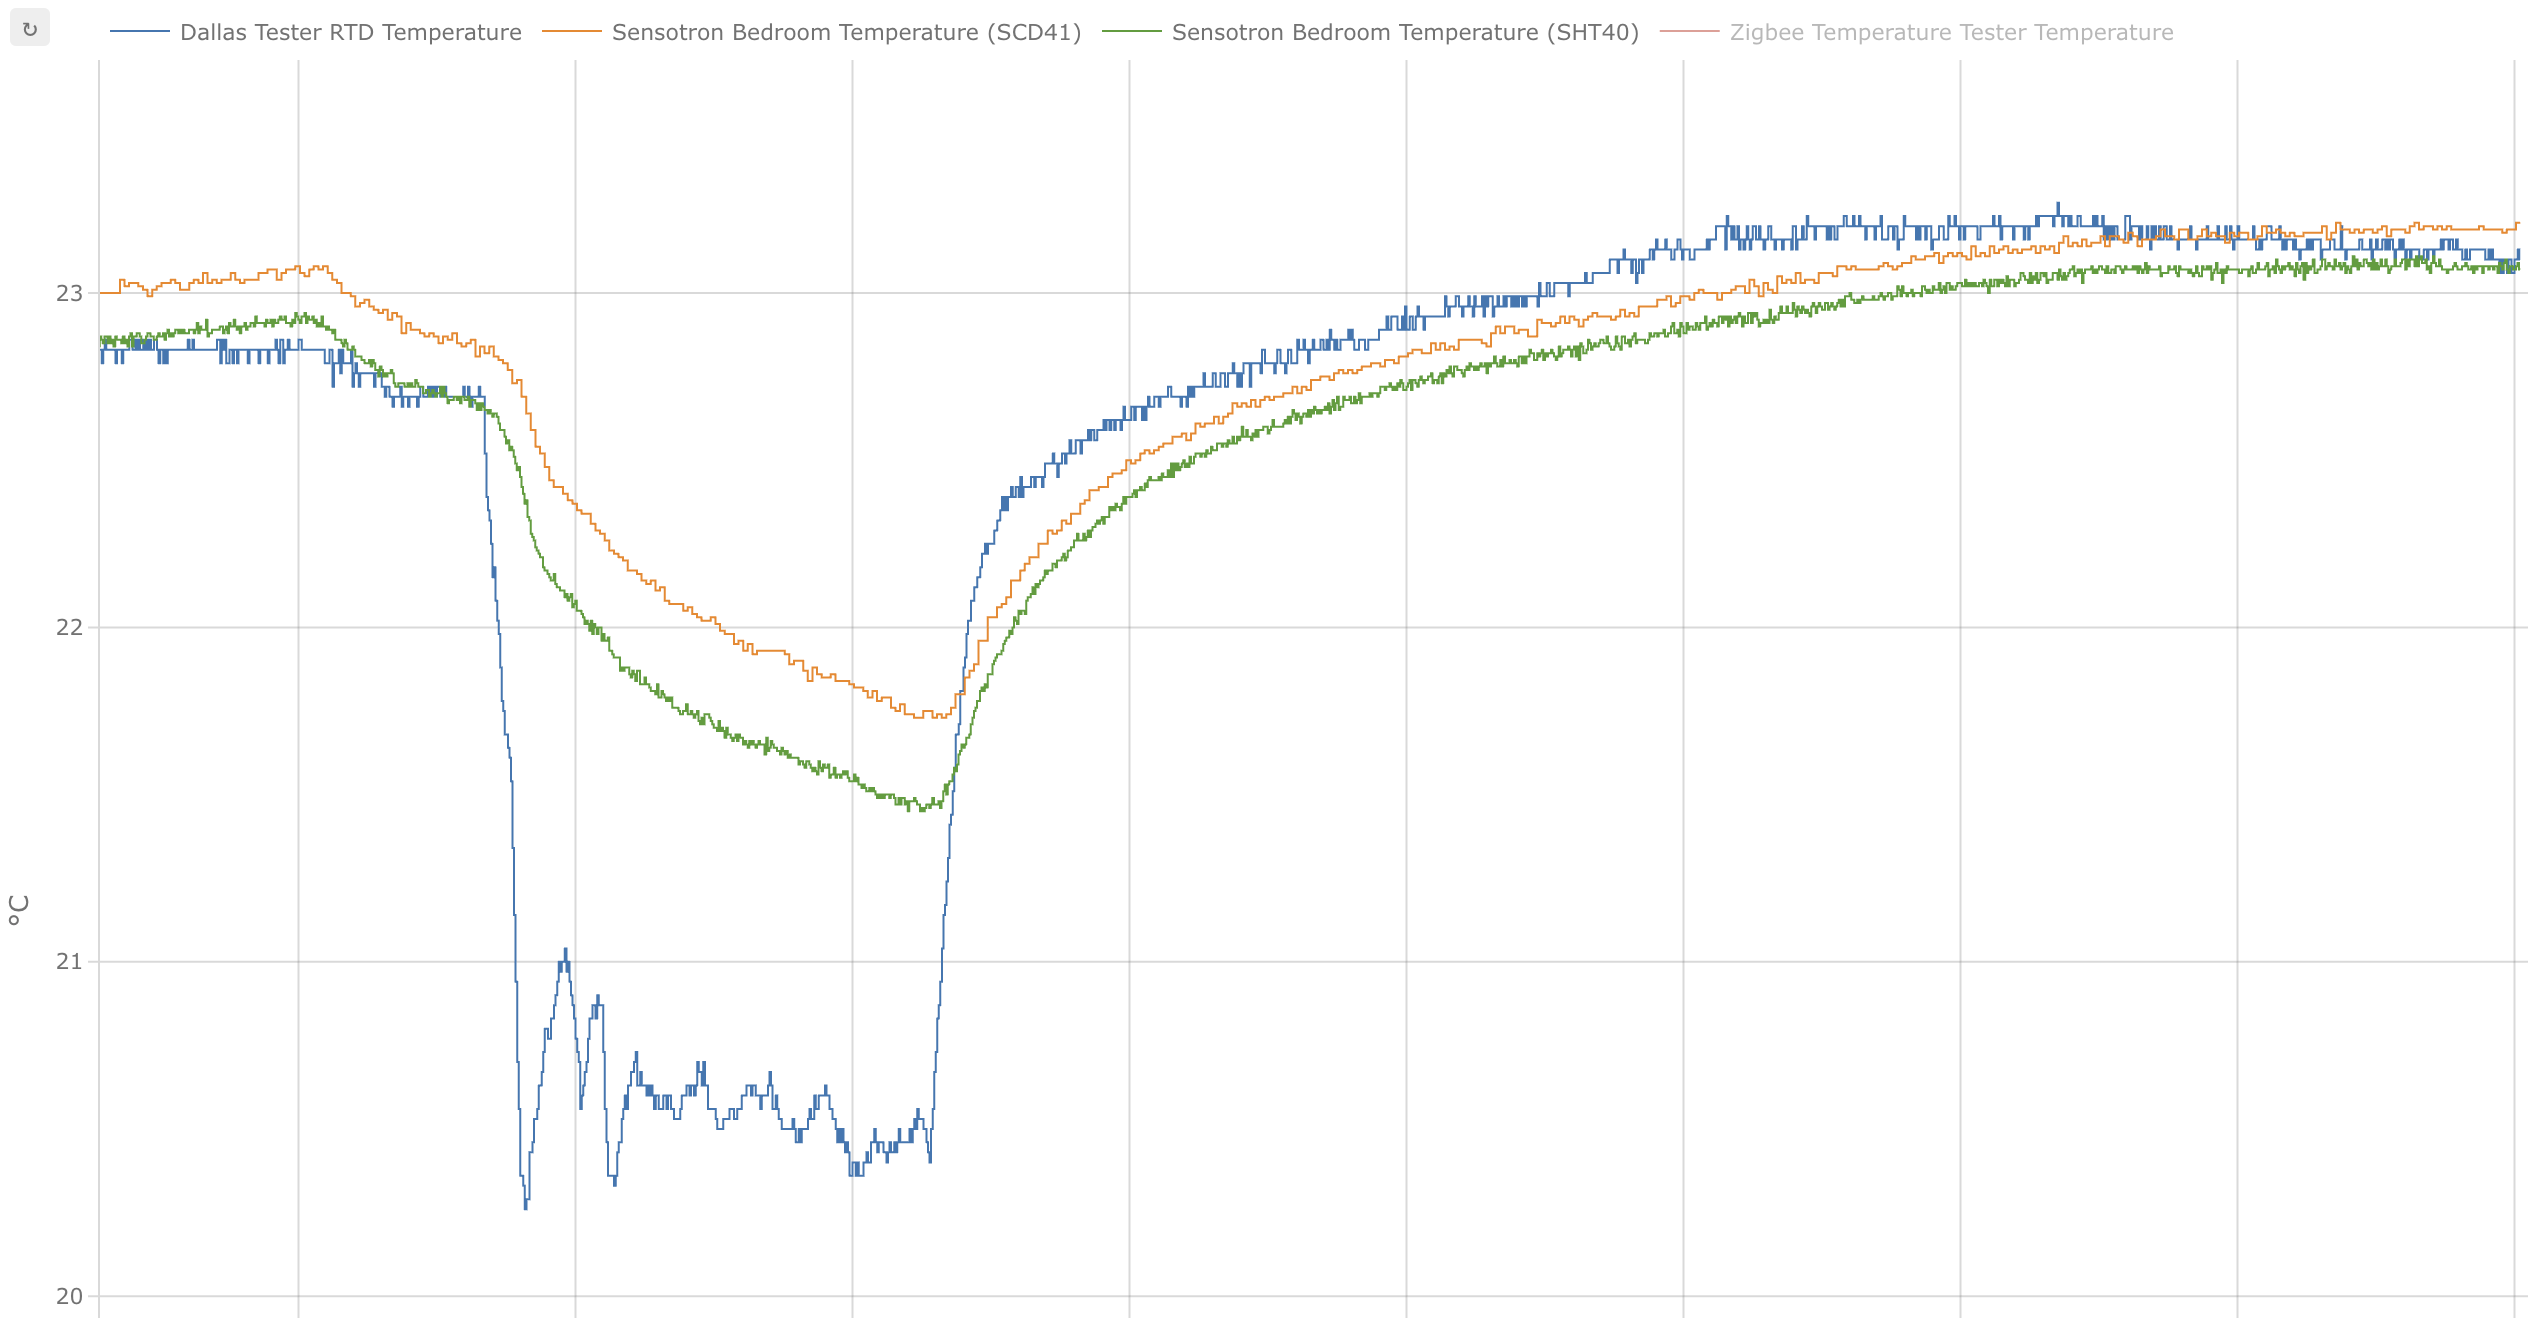
After testing so many sensors, I finally stumbled on a relatively cheap and reliable option: SHT40 from Sensirion. My tests showed that this sensor works reliably in an enclosure, and follows the good units from the SCD41 bunch. When enclosed, it has less sensitivity to sudden temperature drops compared to the non-enclosed RTD probe, but that's expected. Here is a graph showing RTD probe in blue, SCD41 in orange and SHT40 in green.
The final design
I'm quite happy with SHT40, as it allowed me to finally settle on a design for my room sensors:
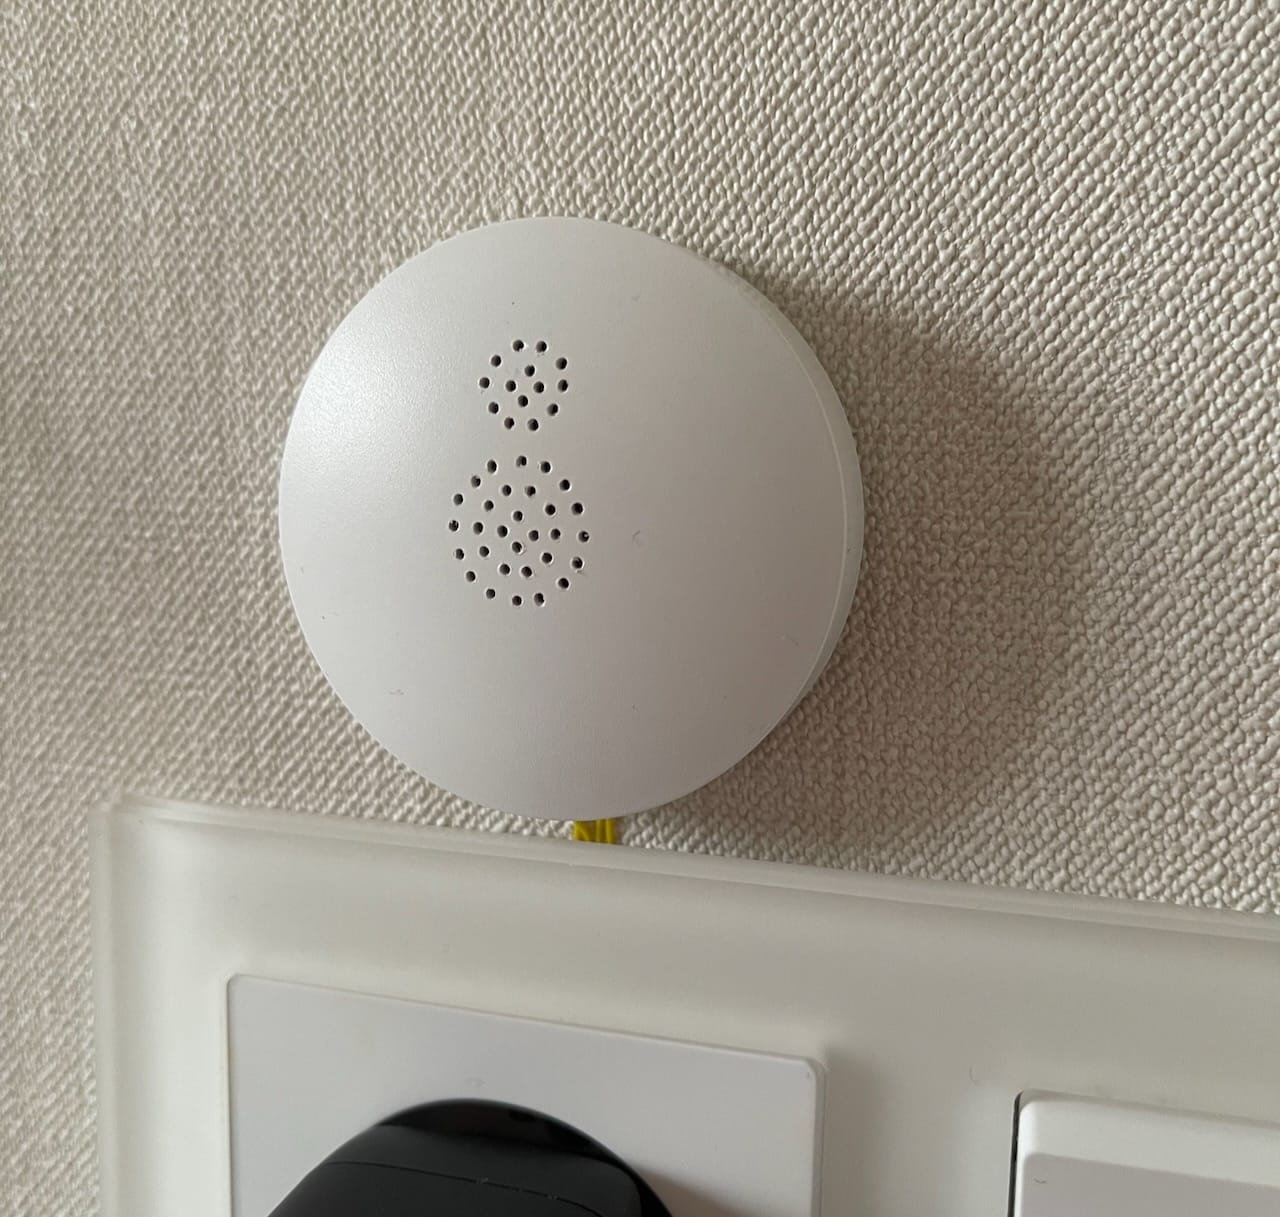
I used a generic LK-AC92 sensor case from AliExpress and hand-drilled two meshes for SCD41 and SHT40 sensors. This is not the pinnacle of craftsmanship, but nobody will look close enough at a wall sensor 😄 I'm using SCD41 for CO2 measurement only and SHT40 for temperature and humidity.
Sonoff SNZB-02P: as good as SCD41 whith increased update frequency
Battery-powered sensors are always a compromise between battery life and update frequency. Sonoff SNZB-02P is a great sensor (it's based on SHT40 from Sensirion), but it provides very infrequent updates out of the box. It reports a value every hour or if temperature changes by 1 °C or more. Such a low sensitivity is not useful for controlling room temperature because of large overshoots that will inevitably happen.
This is a graph of Sonoff SNZB-02P (in gold) versus enclosed SCD41 (in gray) and reference RTD (in green).
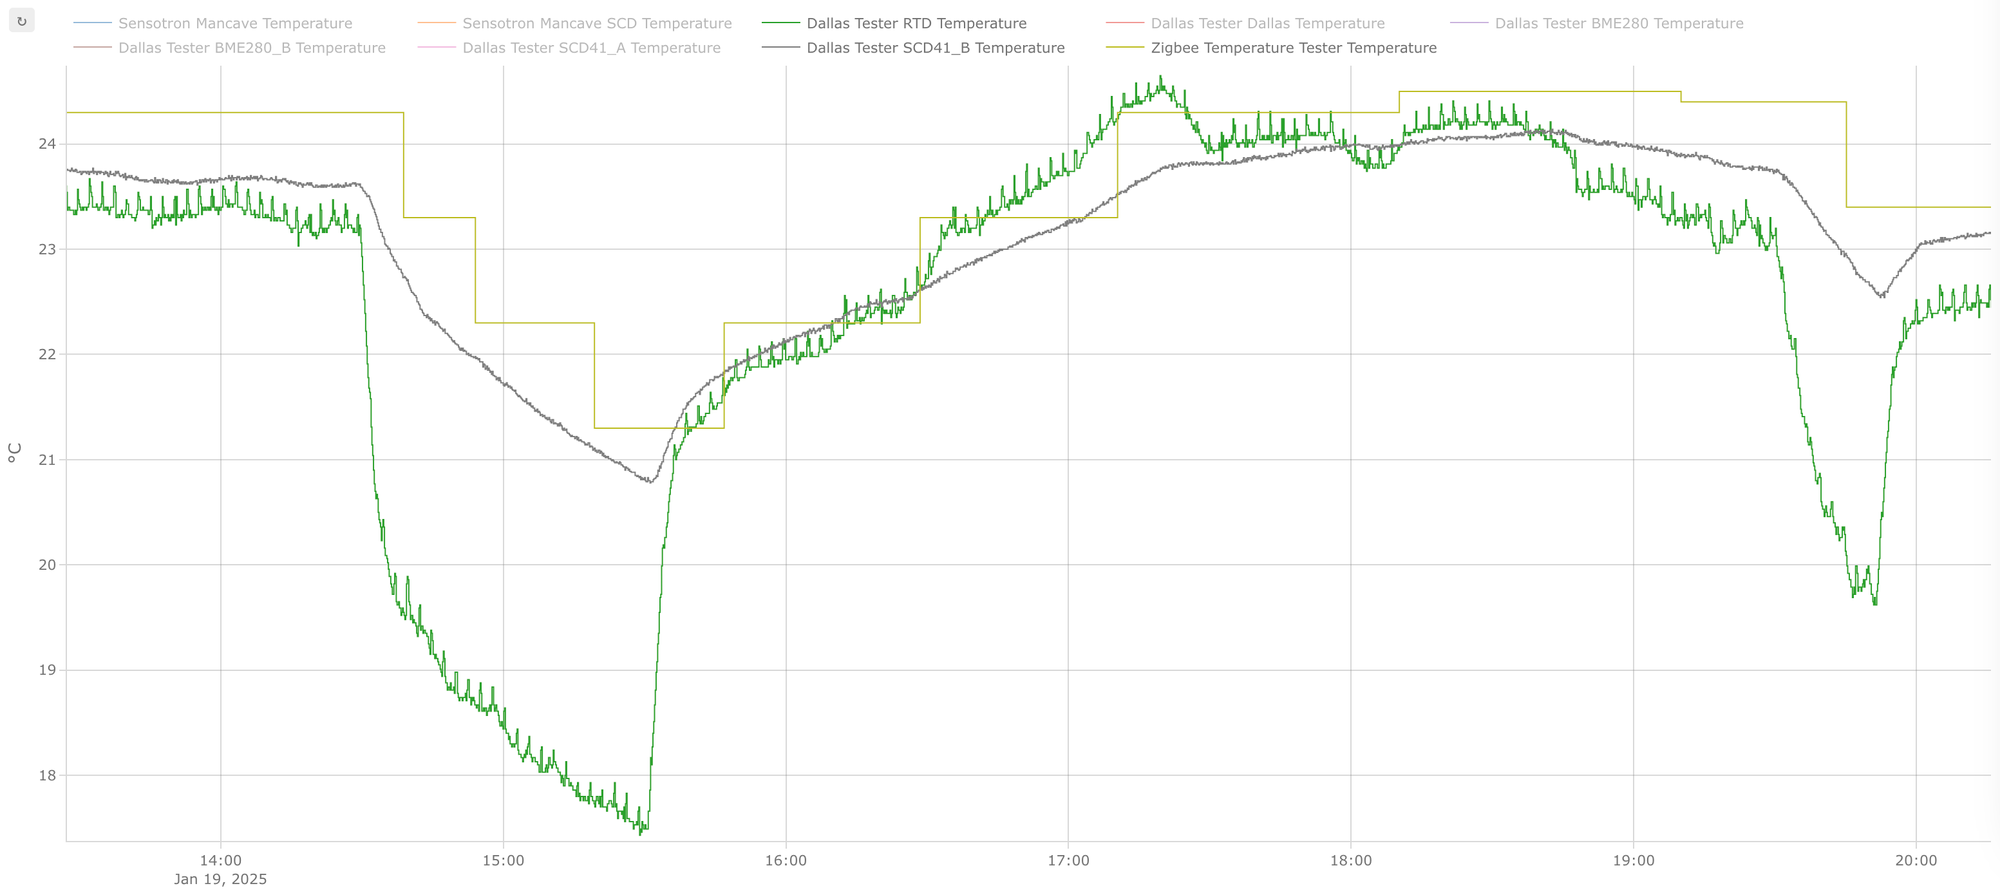
Fortunately, you can change reporting frequency and sensitivity for Sonoff SNZB-02P. I am using Zigbee2MQTT, and these settings can be found under the Reporting tab of your device.

These are the default settings. We are interested in Min/Max rep interval and Min rep change values for Temperature cluster (I'm not an expert in Zigbee terminology, so bear with me).
Min/Max rep intervalare set in seconds and define minimum and maximum update frequency. Max interval is the frequency of mandatory updates, even if measured temperature doesn't change much. Here I set max interval for a Sonoff SNZB-02P sensor to 5 minutes (300 secs), but it doesn't respect this setting very well and still reports approximately once in 30 mins.Min rep changeis the delta with a previous value that is required to do an unscheduled report. For Sonoff SNZB-02P it was set to 1 °C, and I changed it to 0.1 °C. This actually works better than report interval, and sensor starts to report small deltas. Mapping is really not straightforward and is not universal for different measurements (temperature, humidity etc). For temperature the desired delta (0.1 in my case) must be multiplied by 100 to get the setting value (I set it to 10).
After I changed these settings and ran some tests, I found that Sonoff SNZB-02P performed remarkably close to SCD41 in enclosure. Here is Sonoff in gold, SCD41 in gray and reference RTD in green:
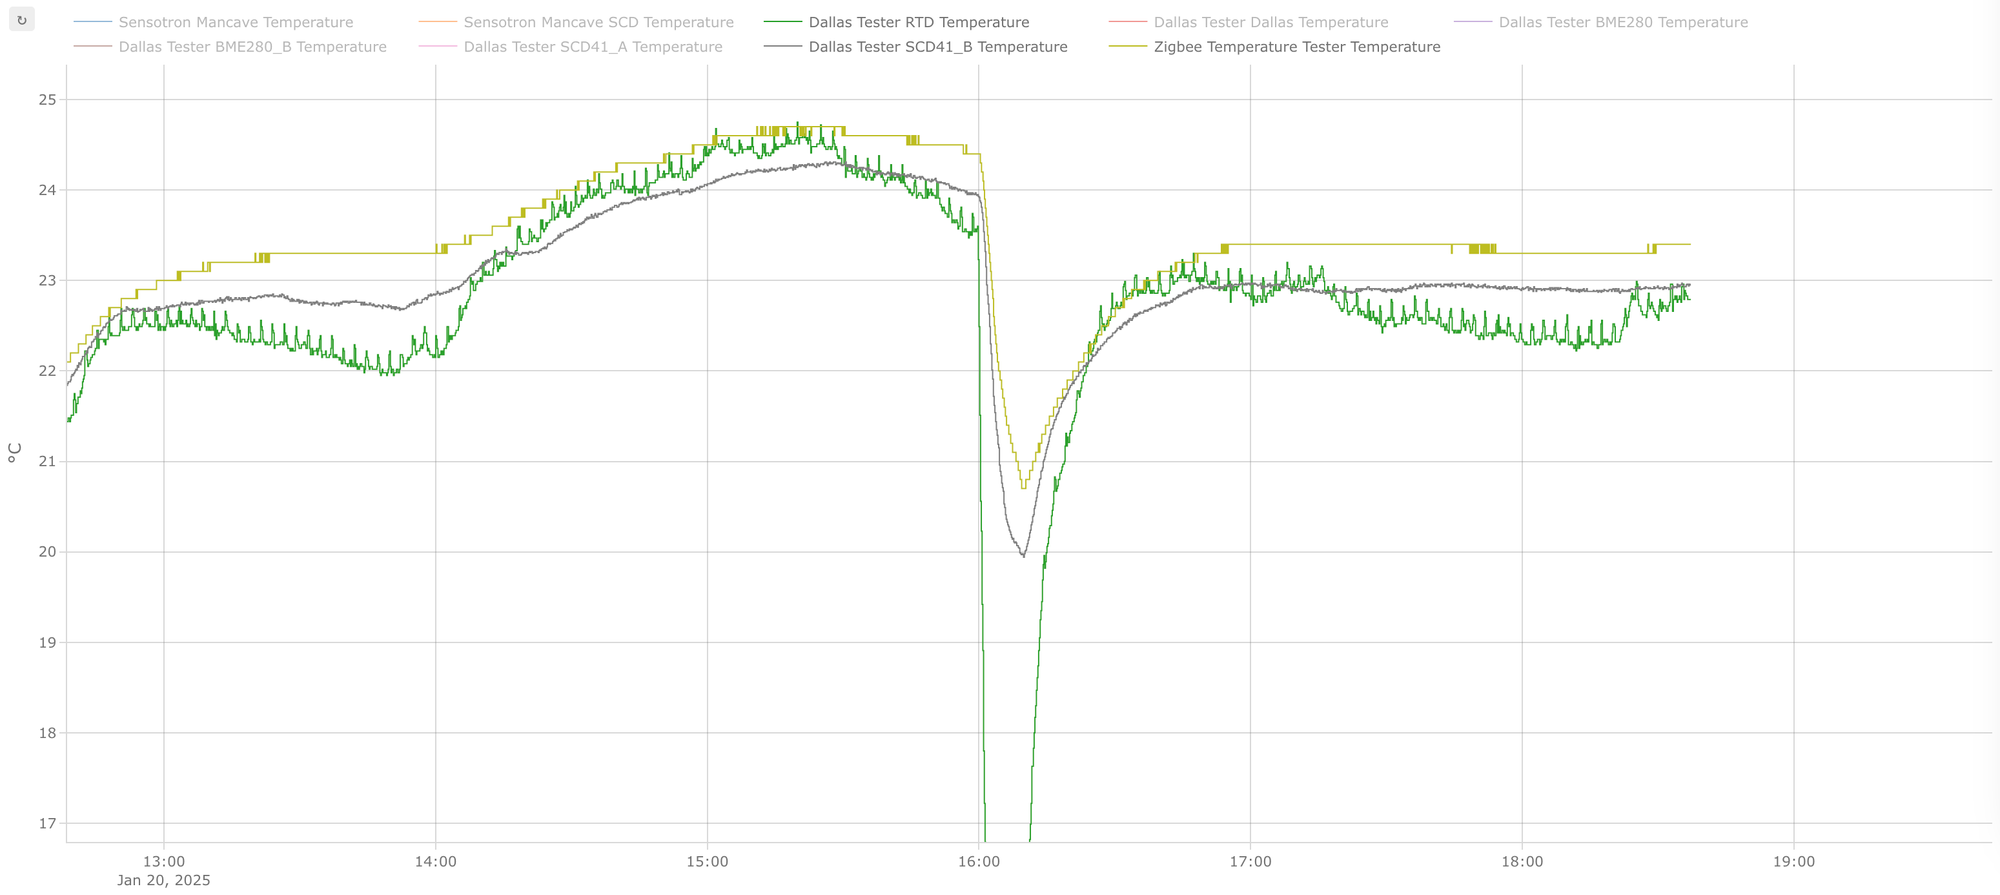
Sonoff sensor needs a little offset, but other than that it is very close to what SCD41 measures.
I don't know how dramatic will the effect of increased frequency on battery life be, but if you consider using this sensor in this mode, also consider providing a mains power source with a hack.
Conclusions
When I started this project, I definitely didn't expect to go this deep into the rabbit hole. I thought that I'll just slap together a couple of random sensors, write some code and be done with my per-room thermostats project. Instead, I'm doing this on and off for almost half a year and get a occasional raised eyebrow from my wife while dipping weird-looking stuff in ice water 😄 But it's actually fun and I learn a lot of stuff in the process, and isn't it this the true goal? ;)
So here's what I would recommend to anyone deciding on which sensor to use:
- If temperature reading is all you are after, and you can get away with sticking an uncovered sensor somewhere not close to a wall, just go with DS18B20. It's the cheapest, easiest and most reliable option in my opinion.
- If you want to measure humidity, go with Sonoff SNZB-02P (with mains power hack if you want more frequency) as a finished device or with SHT40 if you want to integrate it into your own device.
- If you'd like to estimate CO2 levels in the room, use SCD41. You can also try to use BME680 for a more precise temperature reading, but be aware that CO2 readings from this sensor require people living in the house and opening windows on a regular basis. Also, be prepared for inaccurate temperature readings from SCD41. I recommend using it with SHT40 to get the most reliable results.
- If you want a laboratory-grade precision in measuring room temperature, roll the PT100 setup, but don't forget to calibrate!